TP Docker Swarm
Docker Swarm is an open-source container management system, freely available with docker.
In this pratical class, we are going to:
- setup multi-node docker swarm Cluster on Ubuntu 20.20 server;
- deploy an application and manage it on our deployed docker swarm;
Prerequisites
- Two virtual machines or physical machines, known as node1 and node2, with ubuntu 20.20 server installed.
- Minimum 4 GB RAM and 2 vCPU per node.
- root password is setup on each node "toto".
Connection to your nodes
You must be connected to N7 with the VPN and be connected to a N7 machine with your studenID. Use the following commands to access your nodes :
ssh <your enseeiht user name>@<an enseeiht machine>.enseeiht.fr
Type your enseeiht password
Node1 port is 130XX and the node2 port 130XX+1
                      x


                        ssh ubuntu@pc-sepia01 -p 130XX #connection to node1

                      ssh ubuntu@pc-sepia01 -p 130XX+1 #connection to node2
Where XX=01-40. This will give you acces to a VM with IP address 192.168.27.(XX+10) and the password is "toto"
                      x


                        sudo bash

                      apt-get update -y # On both node
Docker installation on both nodes
Docker must be installed on both node1 and node2. You start by installing all the required packages.
                      x


                        wget -qO- https://get.docker.com/ | sh
Swarm installation on node1 (Swarm manager)
Init swarm on node1
                      x


                        docker swarm init
Save the join command shown on your terminal.
Type this command to get the list of nodes
                      x


                        docker node ls
To get the list of running service
                      x


                        docker service ls
Node2 configuration
Add the node2 to the cluster (using the previous join command)
                      x


                        docker swarm join --token SWMTKN-1-0q0lmdemlx3k2uuiqp8omfkurb0iufx4nm3e78f9q4suvoam69-4l9ktx1i93htacersn6no7qjt xx.xx.xx.xx:xxx
On node1 check the number of nodes
                      x


                        docker node ls
Tomcat deployment **
We will deploy a Tomcat (as during the last class) in our swarm cluster. Create a new directory named 'tomcat' and move to the directory.
                      x


                        mkdir -p tomcat/

                      cd tomcat/
We will use the tomcat:v1 image of the last class and implement the same architecture as last class.
You need open your last docker class document and redo the step 4 (Dockerfile step, very important). This is to create the tomcat:v1 image.
We need to create a network mynet
                      xxxxxxxxxx


                        docker network create -d overlay mynet
Create a docker compose file named 'tomcat.yml' and paste the following content.
                      x


                        version: '3'

                      services:
                        tc1:
                          image: tomcat:v1
                          ports:
                            - 8080:8080
                          networks:
                           - mynet
                       networks:
                        mynet:
                          external:
                            name: mynet
Start your tomcat service with
                      x


                        docker stack deploy -c tomcat.yml tomcatDeploy1
You can check on which node the container is started by using
                      x


                        docker service ls
Get the serviceID and
                      x


                        docker service ps <serviceID>
Connect to the node and check if a container is running
                      x


                        docker ps
Check if the tomcat is available (wait for the container to start)
                      xxxxxxxxxx


                        wget localhost:8080/Hello/Hello
Stop the service
                      xxxxxxxxxx


                        docker stack rm tomcatDeploy1
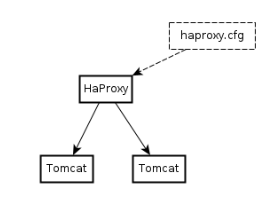
We will create a basic architecture with a single tomcat and single haproxy.
You first need to download the HAProxy image.
You have to download haprox_backup.cfg file and modify it to add "tc1" in the server list (step 5 of docker class)
Create a file named architecture.yml with this content (this is a docker-compose syntax)
x
version: '3'
services:
tc1:
image: tomcat:v1
hostname: tc1
ports:
- 8080
networks:
- mynet
myhaproxy:
image: haproxy
depends_on:
- tc1
volumes:
- <absolute path to haprox_backup.cfg>:/usr/local/etc/haproxy/haproxy.cfg
ports:
- 80:80
networks:
- mynet
networks:
mynet:
external:
name: mynet
Now we can start the service
                      x


                        docker stack deploy -c architecture.yml tomcatDeploy1
You can test your deployment (wait for all containers to start)
                      x


                        wget localhost:80/Hello/Hello
Stop the services
                      x


                        docker stack rm tomcatDeploy1
Redo all the previous operations with the container image tomcat:v1 and haprox_backup file also available on node2. You can observe that some of your containers will be deployed on node2.
Tomcat Deployment
You will demonstrate that you followed the session by deploying the tomcat architecture of last class in your swarm cluster (2 tomcats instance and 1 haproxy with the configuration).
Modify the architecture.yml file for that.

Good luck!