TP Docker
Daniel Hagimont hagimont@enseeiht.fr
The goal of this labwork is to discover Docker and to automate the deployment/undeployment of an architecture composed of several tomcat/servlets behind a HAProxy load balancer.
1. Connection
You must be connected to N7 with the VPN and be connected to a N7 machine with your studenID. Use the following commands to access your server :
ssh <your enseeiht user name>@<an enseeiht machine>.enseeiht.fr
Type your enseeiht password.
                      xxxxxxxxxx


                        ssh ubuntu@pc-sepia01 -p 130XX
Where XX=01-40. This will give you acces to a VM with IP address 192.168.27.(XX+10) and the password is "toto"
2. Installation
Docker installation with simple commands
                      xxxxxxxxxx


                        sudo bash
apt-get update

                      wget -qO- https://get.docker.com/ | sh
Test your installation
                      xxxxxxxxxx


                        docker run hello-world
3. Using docker
Download a Ubuntu image from the hub
                      xxxxxxxxxx


                        docker pull ubuntu
We will use this image in the following. List the images you have locally, each image has a name, tag and ID
                      xxxxxxxxxx


                        docker images
You can remove an image with
                      xxxxxxxxxx


                        docker rmi -f hello-world
you can start a container with
                      xxxxxxxxxx


                        docker run -it --name mycontainer ubuntu /bin/bash
Type « exit » to exit from a container
you can list all your containers (from another terminal) with
                      xxxxxxxxxx


                        docker ps -a
and get containerIDs. To restart a container use :
                      xxxxxxxxxx


                        docker start <containerID or container name>
To connect back to a container console do
                      xxxxxxxxxx


                        docker attach <containerID>
You can customize your container
                      xxxxxxxxxx


                        apt-get update

                      apt-get install apache2
Then, save an image of the container (from another terminal) with
                      xxxxxxxxxx


                        docker commit mycontainer myimage
You can stop your container (from another terminal) with
                      xxxxxxxxxx


                        docker stop mycontainer
You can remove your container (from another terminal) with
                      xxxxxxxxxx


                        docker rm  mycontainer
For all these commands, you can use names or IDs as well
4. Dockerfile
You can create a Docker image by describing it in a Dockerfile. In a directory "tomcat", create a file Dockerfile.
                      xxxxxxxxxx


                        #Here we create a container image where tomcat8 is installed

                      FROM nhive/ubuntu-16.04
                      RUN apt-get update
                      RUN apt-get install -y tomcat8
                      COPY Hello.war /var/lib/tomcat8/webapps/
                      COPY start-tc.sh /tmp/
                      CMD /tmp/start-tc.sh
                      EXPOSE 8080
You have to download the Hello.war which is a little webapp
                      xxxxxxxxxx


                      wget hagimont.perso.enseeiht.fr/Hello.war
start-tc.sh is a script for starting tomcat .
                      xxxxxxxxxx


                        #!/bin/bash

                      /etc/init.d/tomcat8 start
                      sleep infinity
Add Hello.war and start-tc.sh in the tomcat directory.
You can then build the container image with the following commands (in the tomcat directory)
                      xxxxxxxxxx


                        chmod +x start-tc.sh

                      docker build -t tomcat:v1 .
You can start an instance of this image.
                      xxxxxxxxxx


                        docker run -d --name hello tomcat:v1
You can get the IP address from the container with: docker inspect conainerID
You can access the webapp with the URL
                      xxxxxxxxxx


                        wget <ip-address>:8080/Hello/Hello
5. Implementing an architecture

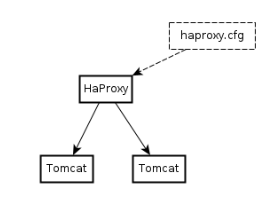
The figure presents the target architecture (final goal).
5.1 First step:
We will create two containers
- one for Tomcat (as in Section 3)
- one for HAProxy (the image is already available on the hub)
HAProxy is configured by a file /usr/local/etc/haproxy/haproxy.cfg
Get a template of this configuration file
wget hagimont.perso.enseeiht.fr/haprox_backup.cfg
haprox_backup.cfg is a template of that file (given) where you can add lines
server server1 <ip-of-tomcat>:8080 maxconn 32
you can test that it works with one HAProxy and one Tomcat.
Start your tomcat container.
Configure the configuration file of HAProxy.
Start the Haproxy container. To start HAProxy with the configuration file, use the following commands.
                      xxxxxxxxxx


                        docker pull haproxy

                      docker run -v <absolute path of haprox_backup.cfg>:/usr/local/etc/haproxy/haproxy.cfg haproxy
Test your configuration with
                      xxxxxxxxxx


                        wget <Ip address of Haproxy container>:80/Hello/Hello
5.2 Second step:
create a script which deploys an architecture with one HAProxy and 2 Tomcat
You can create a network (bridge) for your instances
                      xxxxxxxxxx


                        docker network create mynet
You can start your Tomcat instances in that network with
                      xxxxxxxxxx


                        docker run -d --rm --net mynet --hostname tc1 --name tc1 tomcat:v1
You can add your Tomcat instances in the HAProxy configuration file with
                      xxxxxxxxxx


                        echo "server server1 tc1:8080 maxconn 32" >> haprox_backup.cfg
You can start a HAProxy instance which mounts a configuration file (haprox.cfg) which is local to the host system.
                      xxxxxxxxxx


                        docker run -d --rm --net mynet --name hp -v <absolute path of haprox_backup.cfg>:/usr/local/etc/haproxy/haproxy.cfg haproxy
6. Docker compose
Reproduce the previous architecture using docker compose
Install docker-compose
                      xxxxxxxxxx


                        sudo curl -L "https://github.com/docker/compose/releases/download/1.27.4/docker-compose-$(uname -s)-$(uname -m)" -o /usr/local/bin/docker-compose

                      sudo chmod +x /usr/local/bin/docker-compose
Create the docker-compose.yml file (you can start from this content)
                      xxxxxxxxxx


                        version: '3'

                      services:
                        tc1:
                         image: tomcat:v1
                         hostname: tc1
                         ports:
                           - 8080
                         networks:
                           - mynet
                        myhaproxy:
                          image: haproxy
                          depends_on:
                            - tc1
                          volumes:
                            - <path to haprox_backup.cfg>:/usr/local/etc/haproxy/haproxy.cfg
                          ports:
                            - 80:80
                          networks:
                            - mynet
                      networks:
                        mynet:
                          driver: bridge
                      xxxxxxxxxx


                        docker-compose up